Automated E2e API Testing/Documentation for Node.js

This was my first time doing test driven API development in Node.js and I must say, I really enjoyed it. I used to fall back on a Chrome plugin called Postman a lot before getting used to Mocha and test driven development. It was a joy to write code for a test that described what the endpoint should do before actually coding the new endpoint. It made me think more about the code I was going to write and what it should do. It also happened sometimes that there would be a total API overhaul (like the implementation of softdeletes). And, man was I glad I had written unit tests for all my endpoints when that happened!

But…wait.. won’t I lose a lot of time doing that?!?

unit tests

Writing API tests for a node.js API can be a tedious job. We are dealing with a single event loop, so we need to take in account callbacks. Especially when doing API testing, callbacks can quickly become a pain point. A lot of times, checking whether requests work means triggering other requests sequentially to see if the database was updated by previous requests. This is why, after refactoring a bit of my tests, I was able to create a simple end-to-end testscript that I would just call whenever I wrote a new route. Every time with different input data specific to the route of course. I was later able to tie in APIDoc, a documentation generator that will create a frontend containing the documentation for all your endpoints. So in the end all my endpoints were not only fully tested, but also automatically documented in one go. This was very nice and saved me a lot of time.

Dependencies

Testing

  • We will be using Mocha as a testing framework for our Node.js API.
  • Mocha is great, but not perfect, so on top of it, we will include the supertest package that will provide abstraction for HTTP testing.
  • As I refactored my end to end tests into one single testscript, we will also need a package called partial compare that will do partial matching between test objects and actual return-objects from the api.
  • We will also use should to make our testing code more human readable and easier to write.

API documentation

  • A great library called APIdoc will take care of documenting all of the endpoints
  • A plugin of that library apidoc-plugin-schema will make our life easier.

In the package.json file:

"devDependencies": {
  "apidoc-plugin-schema": "0.0.4",
  "body-parser": "~1.8.1",
  "fs": "0.0.2",
  "jsonfile": "^2.3.1",
  "mocha": "^2.1.0",
  "partial-compare": "^1.0.1",
  "path": "^0.12.7",
  "should": "~4.6.2",
  "supertest": "^0.15.0",
  "type-of-is": "^3.4.0"
}

End to end testing

Wikipedia says:

End-to-end testing is a technique used to test whether the flow of an application right from start to finish is behaving as expected. The purpose of performing end-to-end testing is to identify system dependencies and to ensure that the data integrity is maintained between various system components and systems.

Translate this to API testing and you get:

  1. GET an array of existing data
  2. POST some new data
  3. Test if the new data was posted
  4. Change the new data using PUT
  5. Test if the new data was changed
  6. DELETE the new data
  7. Test if the new data was removed

Of course this is the most simple scenario of RESTful API testing, and I know there’s some other endpoints that can be more complex (like counters, searches, etc.) But I will not elaborate on these in this post as these most of the time imply writing custom tests.

A test script that covers multiple endpoints

Because the sequence of testing is the same for all endpoints, I created a general script that will test different endpoints using the same code but different input based on the endpoint’s data. The input data will be stored in an object that will be called from an endpoint file in the ‘test/routes’ folder.

├── test
|    ├── routes  
|         ├── endpoint1.js
|         ├── endpoint2.js
|         ├── endpoint3.js
|    ├── e2e_tests.js
|    ├── schema_generator.js
|              

The content of the endpoint file will contain the e2e_test options object which has some options for the endpoint tests and apidoc generator. Next to the options, a testData object contains all data needed to perform the tests. The object attributes are pretty self explanatory:

//define the e2e script
const e2e = require('./e2e_tests.js');
// this should refer to the express app you have set up for your api
const app = require('express');

'use strict';

(() => {

	let options = {
    //timeout between requests
		timeout: 200,
    //your express app
		api: app,
    //generate apidoc or not?
		apidoc: false,
    //where do you want to store the schema jsons for the apidoc schema plugin?
		schemaDir: __dirname + `/../data/apischemas/`
	}


	let testData = {
		routeName: 'Articles',
		postObject: {
			title: 'this is an article',
		},
		expectedObjectAfterPost: {
			title: 'this is an article',
		},
		putObject: {
			title: 'this is an article too',
		},
		expectedObjectAfterPut: {
			title: 'this is an article too',
		}
	};

  //You can then call a unit test for this endpoint by calling the script:
	e2e(testData, options);


})();

When we run mocha the end-to-end script will be called and run all tests for that endpoint. If you have specified a schemaDir and the apidoc boolean is set to true, the script will also automatically generate json schemas for the apidoc based on the testData.

node_modules/.bin/mocha

Console output for a working API should be similar to:

-------- Albums tests --------

GET /Albums 200 148.080 ms - 2
Counting Albums: 0
    ✓ Should return an array of Albums
--POST shows/: {"general":{"name":"Ascot"},"time":{"startDate":"2016-04-06T21:51:15.000Z"},"type":"album"}
POST /Albums 200 151.935 ms - 1996
Adding: 1 Album
    ✓ Should create a new Album
GET /Albums/5789159e34150fe84c463f28 200 117.938 ms - 1996
    ✓ Should get the new Album
GET /Albums 200 103.512 ms - 1998
Counting Albums: 1, should be: 1
    ✓ Should return an array of Albums with the correct size
PUT /Albums/5789159e34150fe84c463f28 200 115.422 ms - 1997
    ✓ Should change a Album
GET /Albums/5789159e34150fe84c463f28 200 102.205 ms - 1997
    ✓ Should get the changed Album
DELETE /Albums/5789159e34150fe84c463f28 200 116.241 ms - 2018
Removing: 1 Album
    ✓ Should remove a Album
GET /Albums 200 104.573 ms - 2
Counting Albums: 0, should be: 0
    ✓ Should get an array without the deleted Album

-------- Articles tests --------

GET /Articles 200 92.230 ms - 2
Counting Articles: 0
    ✓ Should return an array of Articles
POST /Articles 200 98.047 ms - 300
Adding: 1 Article
    ✓ Should create a new Article
GET /Articles/578915a134150fe84c463f39 200 99.768 ms - 300
    ✓ Should get the new Article
GET /Articles 200 107.985 ms - 302
Counting Articles: 1, should be: 1
    ✓ Should return an array of Articles with the correct size
DELETE /Articles/578915a134150fe84c463f39 200 99.193 ms - 329
Removing: 1 Article
    ✓ Should remove a Article
GET /Articles 200 101.275 ms - 304
Counting Articles: 0, should be: 0
    ✓ Should get an array without the deleted Article


  2 passing (4s)

info: Done.

API documentation generator

In your route files, above your endpoints, you can then add the following comment blocks:

Change them according to your endpoints of course. They will be used by the APIdoc generator to create the documentation frontend.

/**
* @apiSchema {jsonschema=../test/data/apischemas/<routecaps>-POST-create-a-new-<routesingle>-PARAMS.json} apiParam
* @apiSchema {jsonschema=../test/data/apischemas/<routecaps>-POST-create-a-new-<routesingle>-SUCCESS.json} apiSuccess
*/

The apiSchema references in the comments displayed above will point at the schema jsons that are generated by the schema_generator. The output directory can be changed in the options object in the endpoint test file as illustrated earlier.

Assuming the ./routes folder contains your api’s route files and the ./public folder is the folder that will contain the apidoc frontend, generate your api documentation by running:

apidoc -i ./routes -o ./public/
  • These tests were run using mongoDB, which uses _id as a primary key. You might have to edit the test script to your needs a bit when you are using a different database or key/slug to perform individual GET,PUT,DELETE requests.
  • In the e2e_test script, basic authentication was used. You might also need to change this according to the authentication methods of your API.

The entire code and scripts can be found here

An overview of the Blockchain development Ecosystem

This is an effort in mapping out the current ecosystem of tools and platforms that facilitate development of ‘smart contracts’ or ‘Autonomous agents’ using blockchain technologies.

Development Platforms


icon

RSK is the first open-source smart contract platform with a 2-way peg to Bitcoin that also rewards the Bitcoin miners via merge-mining, allowing them to actively participate in the Smart Contract revolution. RSK goal is to add value and functionality to the Bitcoin ecosystem by enabling smart-contracts, near instant payments and higher-scalability.


icon

MultiChain allows organizations to rapidly design, deploy and operate distributed ledgers


icon

The Open Source Protocol for Creating Digital Assets On The Bitcoin Blockchain


icon

We enable our partners to design, deploy, and operate highly scalable blockchain networks that meet the security, privacy, and compliance requirements of the financial services industry.


icon

Stratumn’s developer tools leverage blockchain tech to offer extraordinary enhancements into all types of systems and business processes.


icon Blockchain Engine

Blockchain Engine (BcE) is a platform designed for developers. BcE offers a suite of tools to create applications and services based off of the Emer blockchain. Not only is it simple to install, configure and integrate into any project, it’s widely available, offered in Microsoft’s Azure platform where it can be deployed on Ubuntu, in the cloud. You can manage it via JSON-RPC, a very simple protocol, and a web-interface.


icon Gem

Gem’s blockchain application platform transforms the way companies and industries connect to solve impossible problems.


icon Counterparty

Counterparty is a platform for free and open financial tools on the Bitcoin network.


icon

Eris is free software that allows anyone to build their own secure, low-cost, run-anywhere applications using blockchain and smart contract technology.


icon

The SAFE Network is soon to provide access to a world of exciting apps where the security of your data is put above all else. In time, downloading the free SAFE software will provide access to: messaging, apps, email, social networks, data storage, video conferencing, and much more.


icon

Stellar is an open platform for building financial products that connect people everywhere.


icon

Rubix is an industry leading blockchain application development team, focusing on interoperability, scalability, performance and security. Rubix supports developers in creating and deploying decentralized applications that are customized for unique industry and business needs


iconEvoluchain

Blockchain platform for smart contracts and decentralized organisations


icon

A powerful toolbox for building blockchain based applications.


icon

CoinStack is a Blockchain-as-a-Service platform of Blocko to build decentralized services on Blockchain. Blockchain as a Service, Coinstack


icon

At Lisk you can develop your own blockchain apps with modern web technologies like HTML5, CSS3 and JavaScript.


icon

Elements is an open source collaborative project where we work on a collection of experiments to more rapidly bring technical innovation to Bitcoin. Elements are features that are proposed and developed in this technical community that in arbitrary combinations can be fashioned into sidechains.


icon

Open source code and developer sidechains for advancing Bitcoin.


icon

Ethereum is a decentralized platform that runs smart contracts: applications that run exactly as programmed without any possibility of downtime, censorship, fraud or third party interference.


icon

BlockApps STRATO is a scalable Ethereum compliant platform for rapid development, deployment and management of enterprise blockchain applications. Our platform enables enterprises to develop early Proof of Concepts (PoCs) and scales all the way to full production systems.


icon

The Hyperledger Project is a collaborative effort created to advance blockchain technology by identifying and addressing important features for a cross-industry open standard for distributed ledgers that can transform the way business transactions are conducted globally.


Api’s and blockchain frameworks

Ðapp Frameworks

Over time this list / overview might grow. If you know of any tools or platforms that were not mentioned in this overview, please comment using the Disqus below, and I will add your insights to the list.

Sending Bitcoins using Bitcore and node.js

This week I was asked to create a simple web app that allows users to send bitcoins from one address to another using node.js. After skimming through some online articles and forums I discovered Bitcore. I also looked at an alternative called BitcoinJs

After comparing both, I decided to use bitcore as it seemed a little bit ahead of BitcoinJs and they also provide nice documentation and development resources on their website. Also, the company that open sourced Bitcore, Bitpay, is an established brand in the Bitcoin industry. BitPay is a payment processor that specializes in processing bitcoin payments and enabling merchants to accept bitcoin using a variety of website plugins and other integrations. Bitcore is their javascript library that allows developers to interface directly with the real bitcoin network.

1. Setting up the app

To kickstart my project, I looked for a suitable Yeoman generator. I had no desire setting up custom or advanced build automation for thisone. It would literally be a single page app that makes two simple API calls:

  • Get the transaction history of a Bitcoin address
  • Perform a transaction

I decided to use the ng-fullstack generator as it seemed to have all the tools I like to work with, except for sass, which I discovered later, after the project was scaffolded. For a moment I was tempted to go with the Angular 2 configuration, but again… it’s literally a 1 page app, so I just went with Angular 1.x. The generator includes a simple todo app, which is nice and it provides you some structure to work with.

After an initial UI overhaul, nothing remained of the todo app, but the UI was kept simple. We have 4 input fields, two address verification buttons and a send button in green.

  • An input field for the origin address
  • An input field for the recipient address
  • An input field for the origin private key
  • An input field for the amount of mBTC to transact

kbt

2. Fetching transaction data

When users enter a Bitcoin address, the app sends an api request to the blockchain.info api and fetches the transaction history for the address. You can see the output of an example request to the Blockchain.info api here

├── server
|    ├── api  
|         ├── wallet
|               ├── services
|                     ├── wallet-service.js
const url = 'https://blockchain.info/address/' + address + '?format=json';

request(url, function(error, response, body) {
  if (error) {
    return reject(error);
  }
  if (response.statusCode !== 200) {
    return reject(response.statusCode);
  }
  let balance = JSON.parse(body);
  resolve(balance);
});

Before sending actual requests, I verify Bitcoin addresses using a simple regex on the clientside:

var BITCOINADDRESS = '(?:[13][1-9A-Za-z][^O0Il]{24,32})';
 

and the bitcoin-address library on the server side.

import bitcoinaddress from 'bitcoin-address';

if (!bitcoinaddress.validate(address)) {
  return reject('Address checksum failed');
}
 

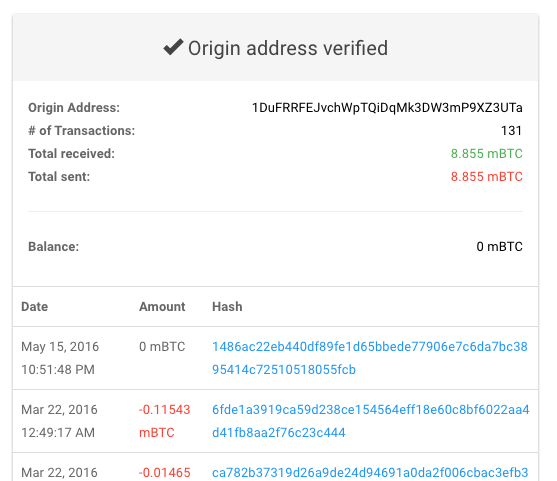
When the address data arrives in my angular client, I display the transaction history table with the dates, transaction results and hashes like so: kbt

3. Creating Bitcoin transactions

To create a Bitcoin transaction, we need 4 things:

  • The Bitcoin address of the sender
  • The private key of the sender
  • A recipient address
  • The amount of Bitcoins to be sent

The information from the input boxes will be checked by a transaction model on the client side and is then sent to the wallet-service.js in the back end. To create transactions using bitcore, we first need to install the bitcore and bitcore-explorers libraries using npm:

npm i --save bitcore-lib && bitcore-explorers

And reference them so we can use them:

import bitcore from 'bitcore-lib';
import explorers from 'bitcore-explorers';
 

3.1 Getting the sender’s balance

Before creating a transaction, we have to do some checks.

Firstly, we have to take in account the miner fee, which is the price we have to pay to send the transaction to the Bitcoin Blockchain. This fee can directly influence the time it takes for a transaction to be confirmed on the blockchain. At the moment of writing, the approximate minimum mining fee is 12,800 satoshis (0.05$). (https://bitcoinfees.21.co/)

Secondly, we need to check if the private key can sign the inputs. This is done by the bitcore library and is pretty complex, so I will not expand on this, but you can find more on signing transactions here.

So, our first check will be to see if the sender address balance can at least cover the mining fee. The bitcore-explorers library includes insight, which is an open-source bitcoin blockchain API that will help us get information regarding our senders’ address. To determine the balance of the sender address, we need to go over the unspent outputs of the sender.

Bitcoin works on the concept of discrete inputs and outputs not spending part of a balance. All transactions have as their input a reference to a previous unspent output. Each transaction records one or more new outputs (which are referenced in the inputs of some future transactions). Outputs are “spent” when they are referenced in a new transaction. Outputs can only be unspent or spent, they can’t be partially spent. Wallet balance (or address balance) is an abstraction to help us humans and make Bitcoin more like conventional payment systems. Balances are not used at the protocol level. When the wallet indicates your confirmed balance is 1.2 BTC it is saying that the sum of the value of all unspent outputs in the blockchain which correspond to public keys it has the private key for total 1.2 BTC. In other words the wallet is computing the total value of the outputs which it can spend which requires a) the output be unspent and b) the client has the private key necessary to spend it. ~ Pieter Wuille

More information on utxos and balances can be found in this answer on stackexchange

Using insight, we can return the array of utxos or Unspent Transaction Outputs:

const insight = new explorers.Insight();
insight.getUnspentUtxos(transaction.fromaddress, function(error, utxos) {
  console.log(utxos);
});

The output in the terminal should be something like:

kbt

The sum of the utxos is basically the balance on the senders’ Bitcoin address, so we can now try the following:

insight.getUnspentUtxos(transaction.fromaddress, function(error, utxos) {
  let balance = 0;
  for (var i = 0; i < utxos.length; i++) {
    balance +=utxos[i]['satoshis'];
  }
  console.log('balance:'+ balance);
});

Which, in my case, returned a balance of 105042196 satoshis:

[0] balance:105042196

3.2 Error handling and input validation

Let’s expand our code, create some constants for the miner fee and the transaction amount and include some error handling. We will also make use of the bitcore Unit utility to define and convert our minerfee, transaction amount and balance variables:

const unit = bitcore.Unit;
const insight = new explorers.Insight();
const minerFee = unit.fromMilis(0.128).toSatoshis(); //cost of transaction in satoshis (minerfee)
const transactionAmount = unit.fromMilis(transaction.amount).toSatoshis(); //convert mBTC to Satoshis using bitcore unit
insight.getUnspentUtxos(transaction.fromaddress, function(error, utxos) {

  if (error) {
    //any other error
    return reject(error);
  } else {

    if (utxos.length == 0) {
      //if no transactions have happened, there is no balance on the address.
      return reject("You don't have enough Satoshis to cover the miner fee.");
    }

    //get balance
    let balance = unit.fromSatoshis(0).toSatoshis();
    for (var i = 0; i < utxos.length; i++) {
      balance += unit.fromSatoshis(parseInt(utxos[i]['satoshis'])).toSatoshis();
    }

    //check whether the balance of the address covers the miner fee
    if (balance - transactionAmount - minerFee > 0) {

      //our transaction code will come here

    } else {
      return reject("You don't have enough Satoshis to cover the miner fee.");
    }

  }
});

I am also defining the same mining fee in the transaction model on the client side so the send button only becomes enabled once the amount entered exceeds the miner fee:

var MININGFEE = 0.12800; //mining fee in mBTC

Let’s also validate the origin and recipient addresses in the backend before any api requests happen.

if (!bitcoinaddress.validate(transaction.fromaddress)) {
  return reject('Origin address checksum failed');
}
if (!bitcoinaddress.validate(transaction.toaddress)) {
  return reject('Recipient address checksum failed');
}

3.3 Creating a new transaction and serialization

This was a bit of a struggle for me at first since it was the first time I worked with the bitcore library and discovered that the error handling was a bit flaky. Hence, I discovered the best way to get around this was to surround the transaction code with a try catch and make use of getSerializationError.

//create a new transaction
try {
  let bitcore_transaction = new bitcore.Transaction()
    .from(utxos)
    .to(transaction.toaddress, transactionAmount)
    .fee(minerFee)
    .change(transaction.fromaddress)
    .sign(transaction.privatekey);

  //handle serialization errors
  if (bitcore_transaction.getSerializationError()) {
    let error = bitcore_transaction.getSerializationError().message;
    switch (error) {
      case 'Some inputs have not been fully signed':
        return reject('Please check your private key');
        break;
      default:
        return reject(error);
    }
  }
} catch (error) {
  return reject(error.message);
}

I decided to create a switch case so I could rewrite possible errors in my own language as I found 'Some inputs have not been fully signed' not very clear towards the end user.

The actual bitcore transaction takes the following inputs:

let bitcore_transaction = new bitcore.Transaction()
  .from(utxos) // Feed information about what unspent outputs one can use
  .to(transaction.toaddress, transactionAmount) // Add an output with the given amount of satoshis
  .fee(minerFee) // the miner fee (is automatically calculated when omitted)
  .change(transaction.fromaddress) // Sets up a change address where the rest of the funds will go
  .sign(transaction.privatekey);  // Signs all the inputs it can

As you can see I have set the change address to the senders’ address. Because outputs can only be unspent or spent, and not partially spent, there’s a concept of “change address” in the bitcoin ecosystem:

If an output of 10 BTC is available for me to spend, but I only need to transmit 1 BTC, I’ll create a transaction with two outputs, one with 1 BTC that I want to spend, and the other with 9 BTC to a change address, so I can spend this 9 BTC with another private key that I own

Here is a very interesting article on change addresses which explains the concept very well. If you haven’t heard of change addresses and are involved in bitcoin transactions in any way, it’s definitely a recommended read.

3.4 Broadcasting the transaction to the blockchain

Now that our transaction has been signed and created, we can broadcast it to the blockchain. As we are not running our own bitcoin node, this will happen via the insight api.

//broadcasting the transaction to the blockchain
insight.broadcast(bitcore_transaction, function(error, body) {
  if (error) {
    reject('Error in broadcast: ' + error);
  } else {
    resolve({transactionId: body});
  }
});

When we put everything together, the entire transaction function looks like this:

static createTransaction = (transaction) => {
  return new Promise((resolve, reject) => {

    const unit = bitcore.Unit;
    const insight = new explorers.Insight();
    const minerFee = unit.fromMilis(0.128).toSatoshis(); //cost of transaction in satoshis (minerfee)
    const transactionAmount = unit.fromMilis(transaction.amount).toSatoshis(); //convert mBTC to Satoshis using bitcore unit

    if (!bitcoinaddress.validate(transaction.fromaddress)) {
      return reject('Origin address checksum failed');
    }
    if (!bitcoinaddress.validate(transaction.toaddress)) {
      return reject('Recipient address checksum failed');
    }

    insight.getUnspentUtxos(transaction.fromaddress, function(error, utxos) {
      if (error) {
        //any other error
        return reject(error);
      } else {

        if (utxos.length == 0) {
          //if no transactions have happened, there is no balance on the address.
          return reject("You don't have enough Satoshis to cover the miner fee.");
        }

        //get balance
        let balance = unit.fromSatoshis(0).toSatoshis();
        for (var i = 0; i < utxos.length; i++) {
          balance += unit.fromSatoshis(parseInt(utxos[i]['satoshis'])).toSatoshis();
        }

        //check whether the balance of the address covers the miner fee
        if ((balance - transactionAmount - minerFee) > 0) {

          //create a new transaction
          try {
            let bitcore_transaction = new bitcore.Transaction()
              .from(utxos)
              .to(transaction.toaddress, transactionAmount)
              .fee(minerFee)
              .change(transaction.fromaddress)
              .sign(transaction.privatekey);

            //handle serialization errors
            if (bitcore_transaction.getSerializationError()) {
              let error = bitcore_transaction.getSerializationError().message;
              switch (error) {
                case 'Some inputs have not been fully signed':
                  return reject('Please check your private key');
                  break;
                default:
                  return reject(error);
              }
            }

            // broadcast the transaction to the blockchain
            insight.broadcast(bitcore_transaction, function(error, body) {
              if (error) {
                reject('Error in broadcast: ' + error);
              } else {
                resolve({
                  transactionId: body
                });
              }
            });

          } catch (error) {
            return reject(error.message);
          }
        } else {
          return reject("You don't have enough Satoshis to cover the miner fee.");
        }
      }
    });
  });
}

We are done! Now we should be able to send Bitcoins using the bitcore library and node.js. You can find code of the entire app in the following github repo: https://github.com/jestersimpps/bitcoin-transact.

Getting Around the Product Variant Limitation in Shopify

Recently, I was struggling with some Shopify products that had more than 100 variant combinations. Shopify has a product variant limitation of 100 per product, whereas products themselves are unlimited. To get around the limitation I wrote a little Node script that creates a unique Shopify product for every variant and links the SKU’s dynamically to option selectors in the product pages.

You can find the script here:

https://github.com/jestersimpps/shopify-node-excel-product-import.git

The script generates HTML for option boxes and javascript combination arrays. This content is then stored in the description body of the products using the Shopify-node API. I had to simulate randomly timed API posts since somehow I was getting errors on API POST bursts. (I’ll revise the code after some more experiments) The script creates two types of products in Shopify: ‘variants’ and ‘products’. This allows you to set custom search filters in the admin and keep the variants separate from the actual products. One product can now have unlimited ‘variants’ (which are actually Shopify products). They are linked in the variant array that is injected in the product descriptions:

var variants = [{"id":13737525511,"price":232.5,"variants":["8.5\" x 11\" "," 100 "," single sided"]},{"id":1232 ...

How to get going:

1. Prepare the Excel file

  1. Add product rows in the products tab
  2. Add the urls to the product images (Shopify will download the images from the urls and add them to your products)
  3. Add product options in the options tab
  4. Add the option identifiers in the option column on the product page
  5. Generate all product variants using the VBA script in the variants page.
  6. When adding new products/options, new variants appear in yellow
  7. Add correct pricing to the variants

2. Using the xls2shop script

1. Add your Shopify credentials

var Shopify = new shopifyAPI({
  shop: '', // MYSHOP.myshopify.com
  shopify_api_key: '', // Your API key
  shopify_shared_secret: '', // Your Shared Secret
  access_token: '', //permanent token
  verbose: false,
  rate_limit_delay: 10000, // 10 seconds (in ms) => if Shopify returns 429 response code
  backoff: 35, // limit X of 40 API calls => default is 35 of 40 API calls
  backoff_delay: 1000, // 1 second (in ms) => wait 1 second if backoff option is exceeded
  retry_errors: true
});

2. Actions:

Removing all products:

node xls2shop.js clean

Uploading product variants from Excel:

node xls2shop.js upload business\ cards\ example.xlsm

3. Add the following javascipt to the product pages in Shopify:

  var variant = findVariant();
  $( "#price" ).html(parseFloat(variant.price * $('#Quantity').val()).toFixed(2) );


  selectors.forEach(function(selectorId){
    $(selectorId).change(function(){
      variant = findVariant();
      $( "#price" ).html(parseFloat( variant.price * $('#Quantity').val()).toFixed(2)  );
    });
  })


  $('#Quantity').change(function(){
        variant = findVariant();
    $( "#price" ).html(parseFloat(variant.price * $('#Quantity').val()).toFixed(2) );
  });

  function addToCart(){
    console.log(variant);
    $.post('/cart/add.js', {
      quantity: $('#Quantity').val(),
      id: variant.id,
      properties: {}
    }).always(function(){
      $.get('/cart.js').always(function(cartData){
        console.log(JSON.parse(cartData.responseText));
        $('#cartItems').text(JSON.parse(cartData.responseText).item_count);
      });
    })
  }

  function findVariant(){
    dance:
    for (var j = 0; j < variants.length; j++) {
      for (var i = 0; i < variants[j].variants.length; i++) {
        if (variants[j].variants[i].replace(/\s/g, '') != $(selectors[i]).val().replace(/\s/g, '')) {
          continue dance;
        }
      }
      return variants[j];
    }
  }

This will take care of passing the SKU of the product variant that was selected to the cart. The product description that contains the variant data is injected in the product page. It contains a selector array and a variants array. The variants array contains all the possible combinations of the selectors with the corresponding product-variant SKU.

The add to cart script can be triggered as such:

<button type="button" onclick="addToCart()">
 Add to Cart
</button>

Dynamic pricing upon selection change is done by setting an element id to price:

$<span id="price"></span>

4. Finally, hide the option selectors in the collection pages

.productOptions{
  display:none;
}
Gitup, the New Git Manager

Work quickly, safely, and without headaches. The Git interface you’ve been missing all your life has finally arrived.

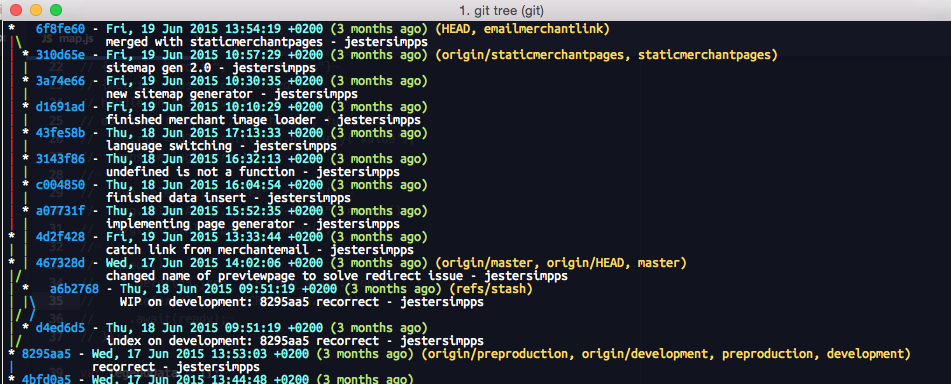
I’m used to gitting in the terminal and visualizing branches like:

git log --graph --pretty=oneline --abbrev-commit

lol, which, I changed in my bash config to:

gt

git1

but…

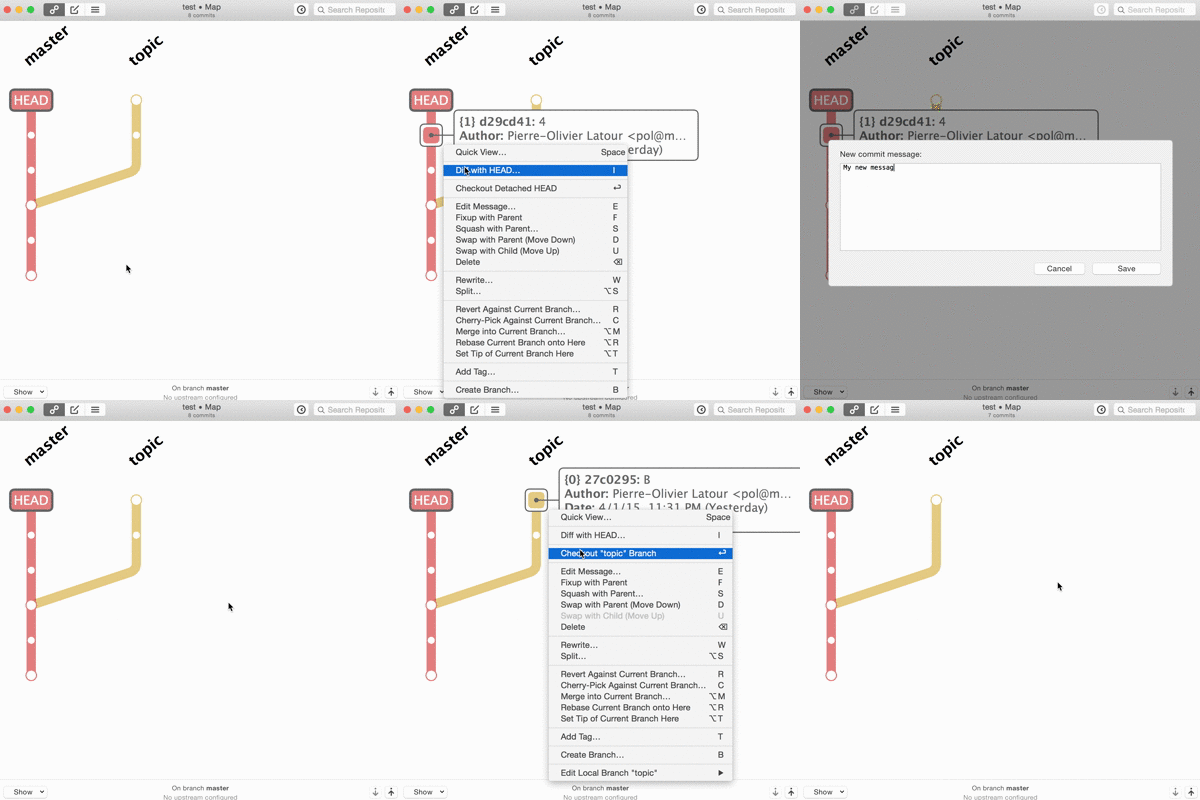
GitUp looks promising:

git1